Angular
angular主要致力于减轻前端人员开发ajax应用程序的痛苦
MVC
MVC核心概念:把管理数据的代码(model)、应用逻辑代码(controller)、向用户展示数据的代码(view)清晰的分离开。在angular应用中:视图就是DOM,控制器就是javascript类,模型数据则被存储在对象的属性中。
数据绑定
单向数据绑定
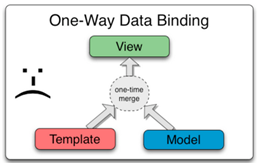
很多传统的模板系统数据绑定都是单向的,如下图:

它们将模板和数据合并起来加入到视图中去,如图表中所示。合并完成之后,从图中的流向可以看出,任何对数据模型或者相关内容的改变都不会自动反映到视图中去。而且用户对视图的任何改变也不会自动同步到数据模型中来。这意味着,开发者需要编写代码来保持视图与模板、模板与视图的同步,无疑增加了开发的工作量。
双向数据绑定
angularjs里的数据绑定模式为MVVM,即双向数据绑定,如下图:

双向数据绑定允许你把应用中的模型看成单一数据源。而视图始终是数据模型的一种展现形式。当模型改变时,视图就能反映这种改变,反之亦然。数据模型(model)与视图(view)组件的自动同步。
Controller
controller作用域问题
<div ng-app="">

       <div ng-controller="firstController">
           <input type="text" value="" ng-model="name"/>

           <div ng-controller="secondController">
               <input type="text" value="" ng-model="name"/>
           </div>
       </div>
</div>
var firstController = function($scope){

    $scope.name = '张三';
    console.log($scope);

}

var secondController = function($scope){

    console.log($scope);
}
ng-app=”“(默认模块)的情况下,控制器函数为全局函数,嵌套在里面的控制器的作用域优先级高于外层的,如果secondController 作用域没有name属性,则会沿着作用域链向上查找。
ng-bind
<div ng-controller="firstController">
            <input type="text" value="" ng-model="name"/>
            <input type="text" value="" ng-model="age"/>
            <div ng-bind="name"></div>
            {{name}}
            <div ng-bind="age"></div>
            {{age}}
</div>
ng-bind主要用来解决当angular加载过慢时,angular来不及解析页面,页面会显示{{name}}等表达式
双向数据绑定原理($apply、$digest、$watch)
$watch
$watch是一个scope函数,用于监听模型变化,当你的模型部分发生变化时它会通知你,我们可以在回调函数编写相应代码
var firstController = function($scope){

    $scope.name = '张三';
    $scope.data = {
        name :'李四',
    }
    // 监听一个model,初始化是触发一次,以后每当model改变时都会触发
    $scope.$watch('name',function(newValue,oldValue){
        console.log("watch_name")
    });
    setInterval(function(){
        $scope.name = "张三1";
        $scope.$apply();
    },1000)

    $scope.$watch('data',function(){
        console.log("watch_data.name")
    },true)
    setInterval(function(){
        $scope.data.name = "李四1";
        $scope.$apply();
    },1000)
}
可以看到,一次是controller初始化的时候触发的,另一次是定时器改变了model的值,如果我们在定时器中不改变name的值
setInterval(function(){
        $scope.name = "张三";
        $scope.$apply();
},1000)
则定时器虽然会触发name属性的监听器,但是不会调用回调函数,因为name属性的值没有改变
$digest()
$digest()是全局作用域$rootScope中的一个方法,用来进行脏检查。$digest循环开始后,它会触发每个watcher。这些watchers会检查scope中的当前model值是否和上一次计算得到的model值不同。如果不同,那么对应的回调函数会被执行。$digest循环一旦触发会执行两次。
$apply()
当我们手动调用$apply()后,$apply()会调用$rootScope.$digest()进行脏值检查。
$apply()和$apply(function(){})的区别是,当你传入一个function到$apply()中的时候,这个function会被包装到一个try…catch块中,所以一旦有异常发生,该异常会被$exceptionHandler service处理。
$apply: function(expr) {
    try {
        beginPhase('$apply');
        return this.$eval(expr);//解析函数字符串
    } catch (e) {
        $exceptionHandler(e);
    } finally {
        clearPhase();
        try {
            $rootScope.$digest();
        } catch (e) {
            $exceptionHandler(e);
            throw e;
        }
    }
}
angular双向数据绑定原理
angular并不存在定时脏检测。angular对常用的dom事件,xhr事件等做了封装, 在里面触发进入angular的digest流程。在digest流程里面, 会从rootscope开始遍历, 检查所有的watcher。
谈起angular的脏检查机制(dirty-checking), 常见的误解就是认为: ng是定时轮询去检查model是否变更。 其实,ng只有在指定事件触发后,才进入$digest cycle:
- angular系统自带的DOM事件,譬如用户输入文本,点击按钮等。(ng-click)
- XHR响应事件 ($http)
- 浏览器Location变更事件 ($location)
- Timer事件($timeout, $interval)
- 执行$digest()或$apply()
angular模块
<!DOCTYPE html>
<html>
<head>
    <meta charset="utf-8">
</head>
<body>
    <div ng-app="myApp">
        <div ng-controller="firstController">
            {{name+a}}<!--a是无效的,不能使用全局变量-->
        </div>
    </div>
<script type="text/javascript" src="../../vendor/angular/angularjs.js"></script>
<script type="text/javascript" src="app/index.js"></script>
</body>
</html>
var myApp = angular.module('myApp',[]);
myApp.controller('firstController',function($scope){
    $scope.name = '张三';
});
function firstController($scope){
    $scope.name = '李四';
}
var a=5;
angular应用有一个默认的模块ng-app=”“,可以使用全局的函数作为控制器(但是不能使用全局变量),上面的输出结果为张三,如果我们指定了模块名称,则控制器会是myApp模块里的firstController,如果myApp模块里没有firstController,则是使用全局的firstController函数作为控制器。
使用模块的优点:可以将不同功能封装在不同的模块中,使用的时候直接依赖进来即可。
$provide
$provide用来自定义服务
var myApp = angular.module('myApp',[],function($provide){
    // 自定义服务
    $provide.provider('CustomService',function(){
        this.$get = function(){
            return {//也可以返回基本类型
                message : 'CustomService Message'
            }
        }
    });
    // 自定义工厂,相当于$provide.provider,只是少了调用$get方法的步骤
    $provide.factory('CustomFactory',function(){//myApp.factory()
        return [1,2,3,4,5,6,7];//也可以返回基本类型
    });
    // 自定义服务,相当于$provide.factory,不过只能返回对象
    $provide.service('CustomService2',function(){//myApp.service()
        return 'aaa';//无效返回,只可以返回对象
    })
});
myApp.controller('firstController',function($scope,CustomService,CustomFactory,CustomService2){
    $scope.name = '张三';
    console.log(CustomService);//Object {message: "CustomService Message"}
    console.log(CustomFactory);//[1, 2, 3, 4, 5, 6, 7]
    console.log(CustomService2);//Constructor {},
});
/*myApp.factory('CustomFactory',function(){
    return [1,2,3,4,5,6,7];
});
myApp.service('CustomService2',function(){
    return "aa";//无效返回,只可以返回对象
});*/
在控制器里自动注入的服务,参数顺序可以是任意的
多个controller里共享数据
多个控制器里共享数据有两种方法:
- 1.使用作用域链
- 2.使用自定义服务
<!DOCTYPE html>
<html>
<head>
    <meta charset="utf-8">
</head>
<body>
    <div ng-app="myApp">
        <div ng-controller="firstController">
            first.data <input type="text" ng-model="data.name" />
            first.Data <input type="text" ng-model="Data.message" />
            <p>
                first-name:{{data.name}}
            </p>
            <p>
                first-message:{{Data.message}}
            </p>
        </div>
        <div ng-controller="secondController">
            <p>
                second-name:{{data.name}}
            </p>
            <p>
                second-message:{{Data.message}}
            </p>
        </div>
    </div>
<script type="text/javascript" src="../../vendor/angular/angularjs.js"></script>
<script type="text/javascript" src="app/index.js"></script>
</body>
</html>
angular.module('myApp',[])

.factory('Data',function(){
    return {
        message : '共享的数据'
    };
})

.controller('firstController',function($scope,Data){
   $scope.data  = {
       name : '张三'
   };

   $scope.Data = Data;
})

.controller('secondController',function($scope,Data){
   $scope.data = $scope.$$prevSibling.data;//上一个控制器的作用域

   $scope.Data = Data;
});
过滤器
数组过滤器可以自定义函数 {{ data.city | filter : checkName }}
$scope.checkName = function(obj){
       if(obj.py.indexOf('h') === -1)
           return false;
       return true;
}
自定义过滤器
<div ng-app="myApp">
    <div ng-controller="firstController">
        <ul>
            <li ng-repeat="user in data | filterCity">
                {{user.name}}
                {{user.age}}
                {{user.city}}
            </li>
        </ul>
    </div>
</div>
var myApp = angular.module('myApp', [], function ($filterProvider, $provide, $controllerProvider) {
    $provide.service('Data', function () {
        return [
            {
                name: '张三',
                age: '20',
                city: '上海'
            },
            {
                name: '李四',
                age: '30',
                city: '北京'
            }
        ];

    });
    //可以用$filterProvider注册过滤器
    $filterProvider.register('filterAge', function () {
        return function (obj) {
            var newObj = [];

            angular.forEach(obj, function (o) {
                if (o.age > 20) {
                    newObj.push(o);
                }
            });
            return newObj;
        }
    });
    $controllerProvider.register('firstController', function ($scope, Data) {
        $scope.data = Data;
    });
})
//用模块方法注册过滤器
.filter('filterCity',function(){
    return function(obj){//obj为要过滤的对象或者基本类型
        var temp = arguments
        debugger;
        console.log(obj)
        var newObj = [];

        angular.forEach(obj, function (o) {
            if (o.city === '上海') {
                newObj.push(o);
            }
        });
        return newObj;
    }
})
显示和隐藏的依赖注入
var myApp = angular.module('myApp', [], ['$filterProvider', '$provide', '$controllerProvider', function (a, b, c) {
    console.log(a, b, c);
}])
.factory('CustomService', ['$window', function (a) {
    console.log(a);
}])
// 隐示的依赖注入
.controller('firstController', function ($scope, CustomService) {
    console.log(CustomService);
})

// 显示的依赖注入
.controller('secondController', ['$scope', '$filter', function (a, b) {
    console.log(b('json')([1, 2, 3, 4, 5]));
}]);

function otherController(a) {
    console.log(a);
}
otherController.$inject = ['$scope'];
指令
渲染指令
<!DOCTYPE html>
<html>
<head>
    <meta charset="utf-8">
</head>
<body>
<div ng-app="myApp">
    <div>
        <p>{{1+1}}</p>
        <p ng-bind="1+1"></p>
        <!-- xml校验写法 -->
        <p ng:bind="1+1"></p>
        <!-- html5校验写法 -->
        <p data-ng-bind="1+1"></p>
        <!-- xhtml校验写法 -->
        <p x-ng-bind="1+1"></p>
        <p ng-bind-template="{{1+1}}"></p>
        <!-- $scope.cityArr = ['上海','北京','杭州'] -->
        <ul ng-class="{red:status}" ng-init="cityArr = ['上海','北京','杭州','广州']">
            <li ng-class-even="'偶数'" ng-class-odd="'奇数'" ng-repeat="city in cityArr" >
            <span>
                index:{{$index}}
            </span>
            <span>
                first:{{$first}}
            </span>
            <span>
                middle:{{$middle}}
            </span>
            <span>
                last :{{$last}}
            </span>
            <span>
                {{city}}
            </span>
            </li>
        </ul>
        <div ng-include="'other.html'">
        </div>
        <div ng-include src="'other.html'">
        </div>
    </div>
</div>
<script type="text/javascript" src="../../vendor/angular/angularjs.js"></script>
</body>
</html>
事件指令
<div ng-app="myApp">
    <div ng-controller="firstController">
        <!-- 注意:这里的函数必须执行 -->
        <button ng-click="changeStatus($event)">切换状态</button>

    </div>
</div>
var myApp = angular.module('myApp', [])

.controller('firstController', function ($scope) {
    $scope.status = false;
    $scope.changeStatus = function (event) {
        // 通过element转换成 jquery对象
        angular.element(event.target).html('切换状态为:' + $scope.status);

        $scope.status = !$scope.status;

    }
})
节点指令
<!DOCTYPE html>
<html>
<head>
    <meta charset="utf-8">
    <style>
        .red{
            color:red;
        }
        .blue{
            color:blue;
        }
    </style>
    <script type="text/javascript" src="../../vendor/angular/angularjs.js"></script>
    <script type="text/javascript" src="app/index.js"></script>
</head>
<body>
<div ng-app="myApp">
    <div ng-controller="firstController">
        <div ng-style="{color:'red',fontSize:'40px'}">测试ng-style1</div>
        <div ng-style="defaultStyle">测试ng-style2</div>
        <div ng-class="{red:true}">测试ng-class1</div>
        <div ng-init="status=true"></div>
        <div ng-class="{red:status}">测试ng-class2</div>
        <ul  ng-init="cityArr = ['上海','北京','杭州','广州']">
            <li ng-class-even="'red'" ng-class-odd="'blue'" ng-repeat="city in cityArr" >
                {{city}}
            </li>
        </ul>
        <div ng-show="false">
            测试ng-show
        </div>
        <div ng-if="false">
            测试ng-if
        </div>
        <!-- 普通src属性里的表达式会延迟解决,会先加载{{src}}字符串 ,解析后再加载正确图片-->
        <img src="{{src}}"/>
        <img ng-src="{{src}}"/>
        <a ng-href="{{src}}">图片链接</a>
        <div ng-init="myVar='google'"></div>
        <!-- ng-switch-when里的表达式字符串不需要加引号,否则出错 -->
        <div ng-switch="myVar">
              <div ng-switch-when="google">
                 <h1>Google</h1>
              </div>
              <div ng-switch-when="taobao">
                 <h1>淘宝</h1>
              </div>
              <div ng-switch-default>
                 <h1>切换</h1>
              </div>
        </div>
        <div ng-init="myVar1=1"></div>
        <div ng-switch="myVar1">
              <div ng-switch-when="1">
                 <h1>1</h1>
              </div>
              <div ng-switch-when="2">
                 <h1>2</h1>
              </div>
        </div>
    </div>
</div>

</body>
</html>
var myApp = angular.module('myApp', [])

.controller('firstController', function ($scope) {
    $scope.defaultStyle = {
        color:'red',
        fontSize:"40px"
    };

    $scope.src = 'http://avatar.csdn.net/C/C/C/3_a409051987.jpg';
})
ng-if和ng-show的区别:ngIf 不会产生dom, ngShow 是代码里有,但通过 CSS 隐藏了。
自定义指令
restrict、template、replace属性
<!DOCTYPE html>
<html>
<head>
    <script type="text/javascript" src="../../vendor/angular/angularjs.js"></script>
    <script type="text/javascript" src="app/index.js"></script>
</head>
<body>
<div ng-app="myApp">
   <directive-tag></directive-tag>
   <div directive-tag></div>
   <div class="directive-tag"></div>
   <!-- directive:directive-tag -->
</div>
</body>
</html>
var myApp = angular.module('myApp', [], ['$compileProvider',function ($compileProvider) {
    $compileProvider.directive("directiveTag", function() {
        return {
            restrict : "EACM",
            template : "<h1>自定义指令!</h1>",
            replace : true,//设置true以后,会把指令标签删除
        };
    })
}])
//.directive('')
restrict 值可以是以下几种:
- E 作为元素名使用
- A 作为属性使用
- C 作为类名使用
- M 作为注释使用
设置为M是在页面是没有效果,也不会替换,但是会运行compile方法
设置replace为true和false的区别:

templateUrl属性
<div ng-app="myApp">
    <script type="text/ng-template" id="customTags2">
        <div>
            hello {{name}}
        </div>
    </script>
    <div ng-controller="firstController">
        <custom-tags></custom-tags>
        <custom-tags2></custom-tags2>
    </div>
</div>
var myApp = angular.module('myApp', [])

.directive('customTags', function () {
    return {
        restrict: 'ECAM',
        templateUrl: 'tmp/other.html',
        replace: true
    }
})

.directive('customTags2', function () {
    return {
        restrict: 'ECAM',
        templateUrl: 'customTags2',
        replace: true
    }
})

.controller('firstController', ['$scope', function ($scope) {
    $scope.name = '张三';
}]);
注意:tempate或者templateUrl里面的内容必须用一个标签包裹起来,不能是’‘<div>1</div><div>2</div>“或者”123”这种形式
tempateUrl里面可以是url或者是script type=”text/ng-template”的id
transclude、priority、terminal属性
transclude用来保存原标签里原有的内容。
priority用来设置指令在模板中的执行顺序,顺序是相对于该元素上其他执行而言,指令默认的priority为0,一般不需要手动设置priority,像ng-repeat默认的priority为1000。
terminal用来设置是否以当前指令的权重为结束界限。如果设置为true,则节点权重小于当前指令的其他指令不会被执行。相同权重的会执行。
<div ng-app="myApp">
    <div ng-controller="firstController">
        <custom-tags>原始数据</custom-tags>
        <div custom-tags2 custom-tags3>
        </div>
    </div>
</div>
var myApp = angular.module('myApp', [])

.directive('customTags', function () {
    return {
        restrict: 'ECAM',
        template:'<div>新数据 <span ng-transclude></span></div>',
        replace: true,
        transclude:true
    }
})

.directive('customTags2', function () {
    return {
        restrict: 'ECAM',
        template:'<div>2</div>',
        replace: true,
        priority:-1
    }
})

.directive('customTags3', function () {
    return {
        restrict: 'ECAM',
        template:'<div>3</div>',
        replace: true,
        priority: 0,
        // 小于0的directive 都不会执行,否则还会继续解析customTags2里的template
        terminal:true
    }
})

.controller('firstController', ['$scope', function ($scope) {
    $scope.name = '张三';
}]);
compile、link属性
Angular指令编译三阶段:
- 将html转换成dom,所有自定义的html标签必须符合html的格式
- 搜索匹配的directive,按照priority排序(默认优先级是0,ng-repeat为1000),并执行directive上的complie方法
- 执行directive上的link方法,进行scope绑定及事件绑定
compile 函数:
使用compile函数可在ng创建原始dom实例以及创建scope实例之前以改变原始的dom(template element)。
可以应用于当需要生成多个element实例,只有一个template element的情况,ng-repeat就是一个最好的例子,它就在是compile函数阶段改变原始的dom生成多个原始dom节点,然后每个又生成element实例.因为compile只会运行一次,所以当你需要生成多个element实例的时候是可以提高性能的。template element以及相关的属性是做为参数传递给compile函数的,不过这时候scope是不能用的。
preLink:
pre-link函数,它能够保证在执行所有子指令的pre-link和post-link函数之前运行一些别的代码。pre-link函数可以在angular执行完compile函数之后,所有子指令的post-link函数将要执行之前运行一些业务代码。scope对象以及element实例将会做为参数传递给pre-link函数。
postLink:
post-link函数,它能够保证在执行所有子指令的pre-link和post-link函数之后运行一些别的代码,它和pre-link的执行顺序相反,被认为是最安全以及默认的编写业务逻辑代码的原因。scope对象以及element实例将会做为参数传递给post-link函数。
link函数负责在模型和视图之间进行同台关联,对于每个指令的每个实例,link函数都会执行一次。可以用来给元素进行事件的注册
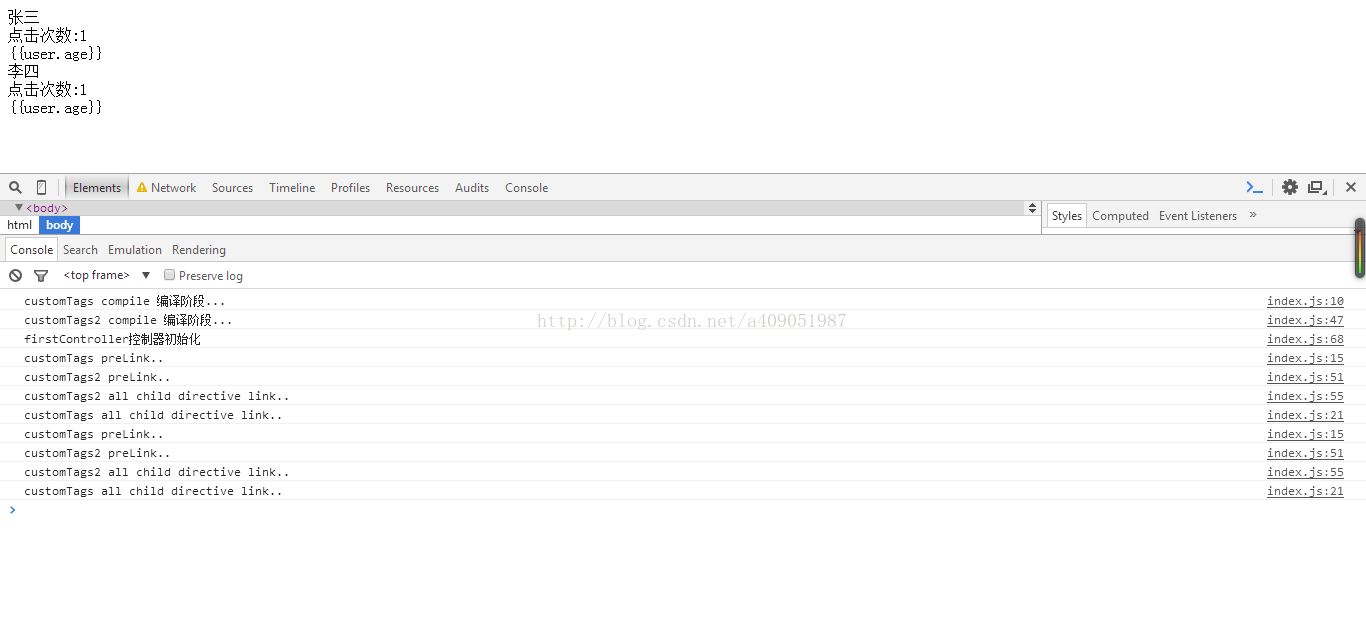
<div ng-controller="firstController">
        <div ng-repeat="user in users" custom-tags="" custom-tags2>

        </div>
</div>
var myApp = angular.module('myApp', [])
    .directive('customTags',function(){
        return {
            restrict : 'ECAM',
            template : '<div>{{user.name}}</div>',
            replace : true,
            //compile函数只运行一次
            compile:function(tElement,tAttrs,transclude){
                // 编译阶段,这个阶段是没有scope作用域的
                console.log('customTags compile 编译阶段...');
                tElement.append(angular.element('<div>点击次数:{{user.count}}</div>'));
                return {
                    // 表示在编译阶段之后,指令连接到子元素之前运行
                    pre:function preLink(scope,iElement,iAttrs,controller){
                        console.log('customTags preLink..');
                        //在link里改变可以改变dom结构,但是不会再解析里面的表达式
                        iElement.append(angular.element('<div>{{user.age}}</div>'));
                    },
                    // 表示在所有子元素指令都连接之后才运行
                    post:function postLink(scope,iElement,iAttrs,controller){
                        console.log('customTags all child directive link..');
                        iElement.on('click',function(){
                            scope.$apply(function(){
                                scope.user.count++;
                            });
                        })
                    }
                }
                // 可以直接返回 postLink
                // return postLink function(){
                    // console.log('compile return fun');
                //}
            },
            // 此link表示的就是 postLink,如果compile有返回函数,则不会执行这个link
            link:function(){
                console.log("执行link")
            }
        }
    })
    //这里template为空,同时定义customTags和customTags2不会报错
    .directive('customTags2',function(){
        return {
            restrict : 'ECAM',
            replace : true,
            compile:function(){
                // 编译阶段...
                console.log('customTags2 compile 编译阶段...');
                return {
                    // 表示在编译阶段之后,指令连接到子元素之前运行
                    pre:function preLink(){
                        console.log('customTags2 preLink..')
                    },
                    // 表示在所有子元素指令都连接之后才运行
                    post:function postLink(){
                        console.log('customTags2 all child directive link..')
                    }
                }

            }
        }
    })
    .directive('customTags3',function(){
       // return postLink;
       return function(){
       }
    })
    .controller('firstController', ['$scope', function ($scope) {
        console.log("firstController控制器初始化");
        $scope.users = [
            {
                count:0,
                name:'张三',
                age:26
            },
            {
                count:0,
                name:'李四',
                age:18
            },
        ];
    }]);

controller、controllerAs、require属性
<div ng-app="myApp">

    <div ng-controller="firstController">
        <div book-list>
        </div>
    </div>
</div>
var globalScope = null;
angular.module('myApp', [])

    .directive('bookList', function () {
        return {
            restrict: 'ECAM',
            controller: function ($scope) {//必须是$scope,是注入的
                console.log("bookList:"+(globalScope == $scope));//true
                this.books = [
                    {
                        name: 'php'
                    },
                    {
                        name: 'javascript'
                    },
                    {
                        name: 'java'
                    }
                ];
                var that = this;
                this.addBook = function(){

                    $scope.$apply(function(){
                        that.books.push({
                            name:'Angularjs'
                        })
                    });
                }
            },
            //将会在scope一个属性为bookListController的对象,存储了该controller属性的数据
            controllerAs:'bookListController',
            template: '<div><ul><li ng-repeat="book in bookListController.books">{{book.name}}</li></ul><book-add test-tag></book-add></div>',
            replace:true,
            link:function(scope,iElement,iAttrs,controller){

            }
        }

    })
     .directive('testTag',function(){
         return {
            restrict:'ECAM',
            controller:function(){
                this.test=function(){}
            },
        }
    })
    .directive('bookAdd',function(){
        return {
            restrict:'ECAM',
            //自己没定义controller属性,去依赖别的controller属性,也可以去查找该元素的其他指令,
            //此时就不需要用^号了,例如testTag
            require:'^bookList',
            template:'<button type="button">添加</button>',
            replace:true,
            controller:function(){
                this.addBook = function(){
                    alert("hehe")
                }
            },
            //将会在$scope里生成属性为bookAddController的对象,指向该指令的controller属性
            controllerAs:"bookAddController",
            link:function(scope,iElement,iAttrs,controller){
                //定义了require属性,这里的控制器是require过来的控制器,会覆盖自己定义的控制器
                console.log("bookadd:"+(globalScope == scope));//true
                //iElement.on('click',controller.addBook);
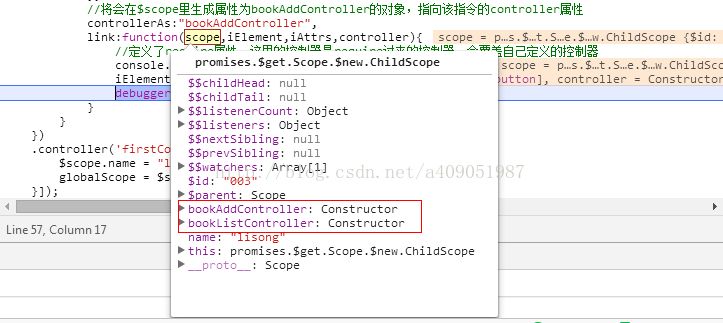
                debugger;//观察scope,请看下图
            }
        }
    })
    .controller('firstController', ['$scope', function ($scope) {
        $scope.name = "lisong"
        globalScope = $scope;
    }]);

从上面的代码可知:
- 默认情况下,控制器下的所有自定义指令都只有一个相同的作用域,那就是控制器的$scope
- 给自定义指令设置controllerAs属性,将会在$scope里生成一个对象,该对象执行了该指令的controller属性。
- 如果指定了require属性,则link的最后一个参数会指向其他指令的controller属性,而覆盖该指令定义的controller属性。
require的参数:
- directiveName:通过驼峰命名指定了控制器应该带有带有那一天指令,默认会从同一个元素上查找指令
- ^directiveName:在父级查找指令
- ?directiveName:表示指令是可选的,如果找不到,不需要抛出异常
scope属性
<div ng-controller="firstController">
    {{
        books
    }}
    <div book-list books="books" parent-books="books" parent-title="{{title}}">
    </div>
</div>
angular.module('myApp', [])
    .directive('bookList', function () {
        return {
            restrict: 'ECAM',
            controller: function ($scope) {
                // &books
                // $scope.books = $scope.a();
                // =books;
                // $scope.books = $scope.b;
                // $scope.b.push({name:'nodejs'});
                console.log($scope.c);
            },
            // 创建一个有继承链的独立作用域
            // scope:true,

            // 当为对象的时候也会创建一个独立的作用域
            scope:{
                // 将父元素books封装成一个a函数
                // a:'&books'
                // 双向绑定 b = parentBooks属性对应的父作用域的表达式
                // b:'=parentBooks'
                // 使用简单数据类型的方法
                c:'@parentTitle'
            },
            controllerAs:'bookListController',
            template: '<div><ul><li ng-repeat="book in books">{{book.name}}</li></ul></div>',
            replace:true

        }

    })
    .controller('firstController', ['$scope', function ($scope) {
        console.log($scope);
        $scope.books = [
            {
                name: 'php'
            },
            {
                name: 'javascript'
            },
            {
                name: 'java'
            }
        ];

        $scope.title = '张三';
    }]);
模块里的constant、value、run方法
angular.module('myApp',[],['$provide','$controllerProvider',function($provide,$controllerProvider){
    console.log('config1');
    // $provide.factory
    // $provide.service
    // $provide.constant
    // $provide.value;
    $controllerProvider.register("secondController",['APIKEY','vension',function(APIKEY,vension){
        console.log(APIKEY);
        console.log(vension);
        console.log('controller2');
    }]);
}])

.config(function(APIKEY){
    console.log(APIKEY);
    console.log('config2');
})

// 在config之后controller等其他服务之前。。
.run(function(){
    console.log('run');
})
// 它可以注入任何方法
.constant('APIKEY','xxxx')

// 只能注入controller...service factory
.value('vension','1.0.0')

.controller('firstController',['APIKEY','vension',function(APIKEY,vension){
    console.log(APIKEY);
    console.log(vension);
    console.log('controller1');
}]);
表达验证
<form name="myForm" action="kittencup.php"  class="container form-horizontal">
    <div class="form-group" ng-class="{'has-error':myForm.username.$dirty && myForm.username.$invalid}">
        <label class="col-sm-2 control-label">用户名</label>
        <div class="col-sm-10">
            <input type="text" autocomplete="off" name="username" ng-pattern="/^[a-zA-Z]{1}/" ng-required="true" ng-minlength="5" ng-maxlength="10" ng-model="username" class="form-control" placeholder="用户名">
            <div ng-show="myForm.username.$dirty && myForm.username.$error.maxlength" class="alert alert-danger help-block">
                用户名长度不能超过10位
            </div>
            <div ng-show="myForm.username.$dirty && myForm.username.$error.minlength" class="alert alert-danger help-block">
                用户名长度不能小于5位
            </div>
            <div ng-show="myForm.username.$dirty && myForm.username.$error.pattern" class="alert alert-danger help-block">
                用户名必须已英文字母开始
            </div>
            <div>用户名:{{username}}</div>
        </div>
    </div>

    <div class="form-group">
       <div class="col-sm-offset-2 col-sm-10">
           <button type="submit" class="btn btn-default" ng-disabled="myForm.$invalid || data.hobbies === undefined || data.hobbies.length === 0">注册</button>
           <button type="reset" class="btn btn-default" ng-click="reset()">重置</button>
       </div>

    </div>
</form>

